Friday, December 27, 2013

DIY Christmas 2013. Part 4.

The past two posts I've been explaining what I've done for my DIY gifts this Christmas. I wanted to spend time on creating gifts this year instead of spending money on something meaningless.

My Brother and his new Wife:
My brother got married in November. I was designing his wedding invitations with his soon to be wife and she would pin things on Pinterest for my inspiration. She really liked these emblem looking things. So I designed one for them. It was the hero image on their website michaelandashley.us


So for Christmas I decided to take this emblem and create a stamp for them. I had an internship at a design agency about 2 years ago. They have a laser printer. So I contacted my boss there to see if I could use his machine to make a stamp for my brother and sister-in-law's Christmas present. Once the rubber was printed, I superglued the stamp to a wood back and wrapped it for them with a black stamp pad. Ashley's face on Christmas morning was so surprised. It was a pretty simple gift but a gift that meant a lot.


Grandma:
I find it extremely hard to get grandparents anything. Especially the grandmother on my dad's side. She really just loves her grandchildren and would like to see them more. Last year I gave my grandma a picture frame with pictures of me and her throughout the years. She started crying in the middle of the Christmas party. It was hard for me not to tear up either. 

This year my siblings and I got a photo album and each wrote a short letter to our grandmother sharing our favorite memory of her and telling her how much we love her. Unfortunately, we weren't able to snap of pictures of the book before we gave it to her. 

The book started out with a letter from out youngest sister. Then next page was the most recent picture of that sister. Then next pages were letters from the rest of us, youngest to oldest. My grandmother started reading them out loud. Once she got to my 17 year old sister's letter, her voice got really high and shaky. She started to cry. She couldn't read the rest of the letters out loud so she read them silently. We watched as she smiled and we could see her taking those walks down memory lane with us. When she read the last letter, she closed the book and looked at all of us with tears in her eyes. She pulled the book close to her chest as said "This is going in my casket." 

Classic Grandma. Always the comic relief.

DIY Christmas 2013. Part 3.

The past two posts I've been explaining what I've done for my DIY gifts this Christmas. I wanted to spend time on creating gifts this year instead of spending money on something meaningless.

So I have 3 teenage sisters. Three. I can remember my teenage years like they were yesterday but for some reason, it was really hard to find something to make for these sisters. Honestly, all they want is clothing. I thought about giving them cash and then taking them shopping and to lunch one day. Instead of making them something, I would just spend time with them. Once I got home I realized that these girls were social butterflies and while I had made room on my schedule to spend time with them I started to get the feeling that they wouldn't do the same. I didn't want to just give them cash. I wanted to do something meaningful. So I hoped onto Pinterest and typed in "DIY Teen Gifts." I combined a few different ideas and got some new ideas based on other projects people had posted to Pinterest.

For Sarah: Duck Tape Tablet Case
My 12 year old sister Sarah has a tablet that has no case so consequently it has cracks all over in the screen. And for some reason kids this age are completely obsessed with Duck Tape. This girl has a whole stash of Duck Tape. I don't get it but she likes that kind of stuff. So I took upon myself the task of creating a case out of Duck Tape. I didn't have a pattern or a tutorial. I just bought some Duck Tape, sat down at the table with Sarah's tablet and started experimenting with ways to make the case. I cut 2 equal sized pieces out of a cereal box. I covered those in duck tape. I connected the pieces with Duck Tape that would serve as the spine. I then put pieces of tape on each corner to hold the tablet in place. To be honest, it turned out a lot better than I thought it would have.


For Kaitlin: Painted Hoodie
My almost 14 year old sister Kaitlin is your typical 14 year old. She hangs out with friends, she's pretty good in school, she is amazing at gymnastics, and SnapChats me like 4 times a day. I wasn't sure what I could make her. I started paying attention to the kind of clothing she wears. She's a fan of the basics. You know, tees, tanks, jeans, leggings, hoodies... those kinds of things except her basics have really fun patterns on them. I'm not sure if this is cheating but I went a bought her a hoodie and created a design on it with fabric paint. This project is ridiculously straight forward.


For Kim: Sharpie Shoes
So my 17 year old sister Kim is a senior in high school and she likes to hang out with friend 24/7. And she talks a lot about long boarding. I saw something on Pinterest where someone took a Sharpie to a pear of white sneakers. Yeah, that sounded easy. So I bought a pair of white sneakers and hit the Sharpie aisle to find some awesome colors. I went home and started sketching ideas. Then I started on the shoes. Let me tell you, it took like an hour for each shoe. I thought it would have taken a lot longer. But it was worth it. These shoes are awesome and no one else will have them!!


DIY Christmas 2013 Part 2.

In the previous post I explained that I wanted to give DIY gifts this year for Christmas. I love giving gifts because I love the challenge of trying to find gifts that are meaningful.

This post talks about the present that I gave my mom. She works as a nurse on the over night shift. During the day she watches my 5 year old sister , works on sewing projects, and sells Tupperware. A few months ago she asked me to help create her business cards and a label to put on her catalogs. Since her first order of these I know she has ran out of stock so I decided to reorder her cards and labels.


In November I stayed at my parents' house for my brother's wedding. I noticed that my mom's Tupperware business was taking off and she had no storage for all her inventory. Her piano room, that is somewhat of a sanctuary for my mom, had suddenly been taken over by plastic casserole dishes and Tupperware branded boxes. If my mom needed anything for Christmas it was some place for her to conduct business.

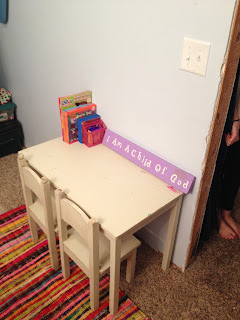
My brother and I put our heads and money together to create a craft/hobby room for my mother. She loves to sew and is always working on new projects. This could also serve as a place to store her Tupperware inventory as well as her catalogs, invoices, business cards, and other business things. In our parent's basement there is an slightly unfinished, cluttered storage room. We knew that this would probably be the best place for us to create a place that is only designated for our mom and her hobbies. Here is what we started with:


My brother and I recruited some of our other siblings, including our extremely pregnant sister (pictured above) to help clean out and organize the room. We got rid of a few broken pieces of furniture, empty cardboard boxes, and put boxes that were storing items into another, slightly more organized storage room in the house. We then organized all the sewing scraps, sewing patterns, and Tupperware.

After the organization was complete we went shopping. We purchased a comfy chair, a colorful rug, Rubbermade storage drawer, industrial shelves, a small ironing board, a clothing rod, and a small table for our 5 year old sister to play at while my mom is working on projects.


It was hard trying to keep this project a secret from our mom. She knew something was going on in the basement but we told her that she couldn't go in that room because we were hiding her Christmas present in there. Knowing my mom, she totally peaked.

Sunday, December 15, 2013

DIY Christmas 2013. Part 1.

This year I decided to do a DIY Christmas, which means I've been extremely busy turning my apartment into Santa's workshop. Now, there are many reasons to do a DIY Christmas. One of the reasons being that it's relatively inexpensive. While I'm sure some people can make that happen, I've realized that this year's line up of homemade gifts has actually cost the same, if not more than gifts I have purchased in previous years. But I'm not doing a DIY Christmas to save some money. I'm doing a DIY Christmas because making something means more than buying a meaningless gift.

Here's how I look at it. In previous years, I hadn't really made a lot of money. I was in college or trying to land my first full time job. Cash was something I had very little of. So when I would save my money to buy people in my life presents, that was actually a sacrifice. Now, I'm not saying I'm made of money, but this is the first year I've had a full time salary job. My financial situation has made it easier for me to spend money. Therefore, buying gifs for loved ones isn't much of a sacrifice. Although my paychecks have gotten larger, the amount of free time I have has gotten smaller. Making gifts is time consuming and requires me to sacrifice my free time. I think that the ultimate way to show someone you care about them is to give them something you don't have a lot of.

I wanted to start blogging about all my projects weeks ago but seeing that these projects are Christmas gifts, I had to wait until the recipients unwrapped them before I could share. This week I was able to give the children of families I babysit their gifts, so,  here is part one of DIY Christmas 2013!

Fort in a Bag:


This year my roommate's cousin and her 3 kids moved to Chicago. They invite us over every Sunday for dinner. I babysit their kids every once and while. They've become almost like my Chicago family. So last week, we invited their family over for a Christmas party. We made Graham Cracker houses, drank eggnog and sparkling cider. Someone turned on the record player and we danced to ABBA for about an hour. They have three kids. Deputy (7), Lincoln (5), and Odin (3). I wanted to make them something that they could do as a family. Something that they could all share. These kids are little geniuses so I wanted to give them something that could spark their creativity.


So, I purchased a few full size flat sheets, clothes pins, suction-cup hooks, and glow sticks. I threw them all in a bag and sewed a label on it saying "Fort in a Bag." In order to make the sheets the ultimate fort building sheets, I sewed ribbons along the edges so the kids could tie the sheets together or tie them to furniture or hooks in their home. I also took a couple colored sharpies and drew patterns on the clothes pins in order to make the boring wood a bit more fun.

Lincoln and Odin making their first fort!


Aprons!

So I met Sarah and Natalie 5 years ago when I taught them swim lessons. I started babysitting for them and their family soon became my family. I've seen these girls change from toddlers to preteens. But one thing they've always loved doing, is baking. When ever I come over they have some baking project that they want to do with me. So this year I decided to give them their own baking kit. I made them each aprons and gave them their own kid sized spatula and wisk and a cake pop kit.

I basically made the pattern myself. I took some butcher paper and cut out the shape I needed. 


Sewed a pocket on the front and the ties around the neck and the waist.


Here are the girls modeling for me!


Well, those are the first 2 projects! Stay tuned for more...